 Nederlands
 English
Node-RED - Advanced
In this follow-up lesson, we will let your AI-Bot have a conversation with you and recognize objects.
You can have a conversation with at least two people, of whom one speaks and the other one listens. The other person can respond after listening. So to mimic a conversation with your AI-Bot, the AI-Bot needs first to be able to listen to you.
Making your AI Bot listen
Create a new worksheet named "Advanced". Immediately rename worksheet "Flow 1" to "Basics" by clicking "Flow 1" twice, rename and save by clicking "Done".
On this new worksheet, drag a "listen" node (heading "TJBot").
If you now read the information from the "listen" node you will see that you can start or stop the node with a message "msg.mode".
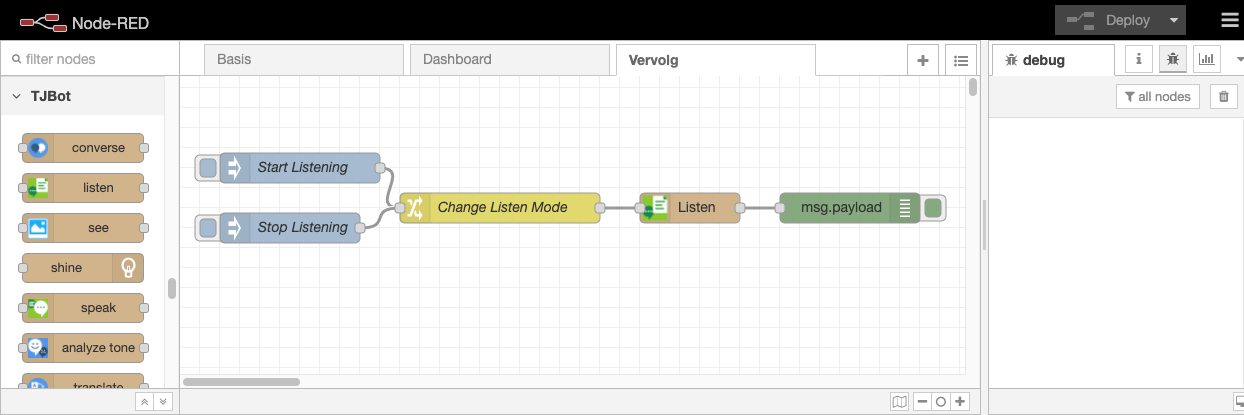
We are going to build this by dragging a "change" node, two "inject" nodes and a so-called "debug" node to the worksheet as in the example below. With this "debug" node we can easily read what the AI-Bot has heard.
Debugging tools are often used to remove any errors (bugs) from a program.
You connect the two "inject" nodes to the "change" node. The "change" node goes to the "listen" node, and the output of the "listen" node goes to the "debug" node.
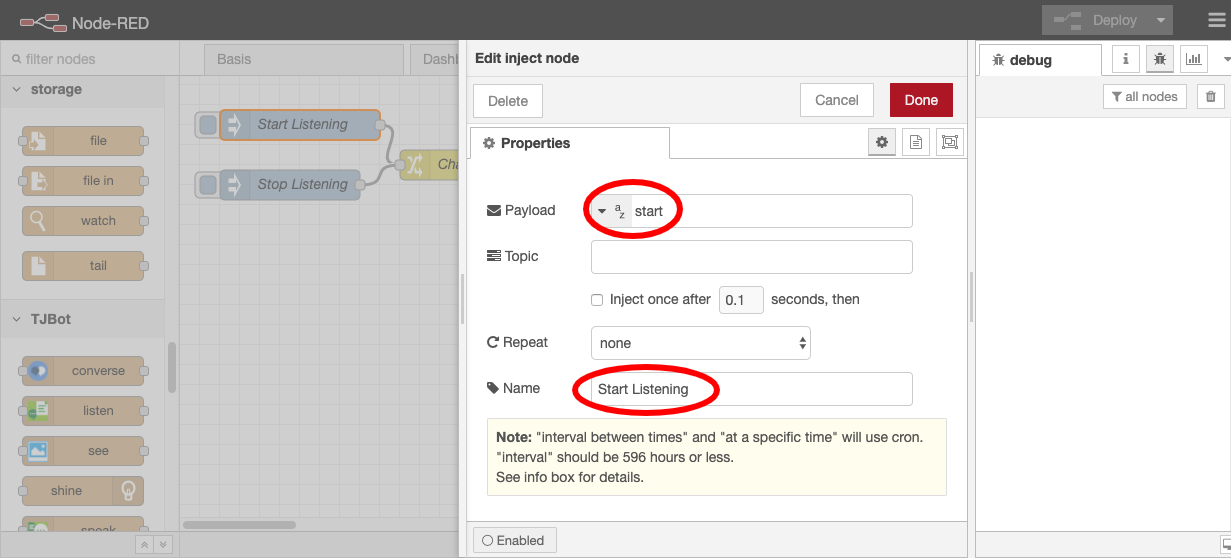
Now adjust the first "inject" node.
Payload: <String> "start"
Name: "Start Listening"
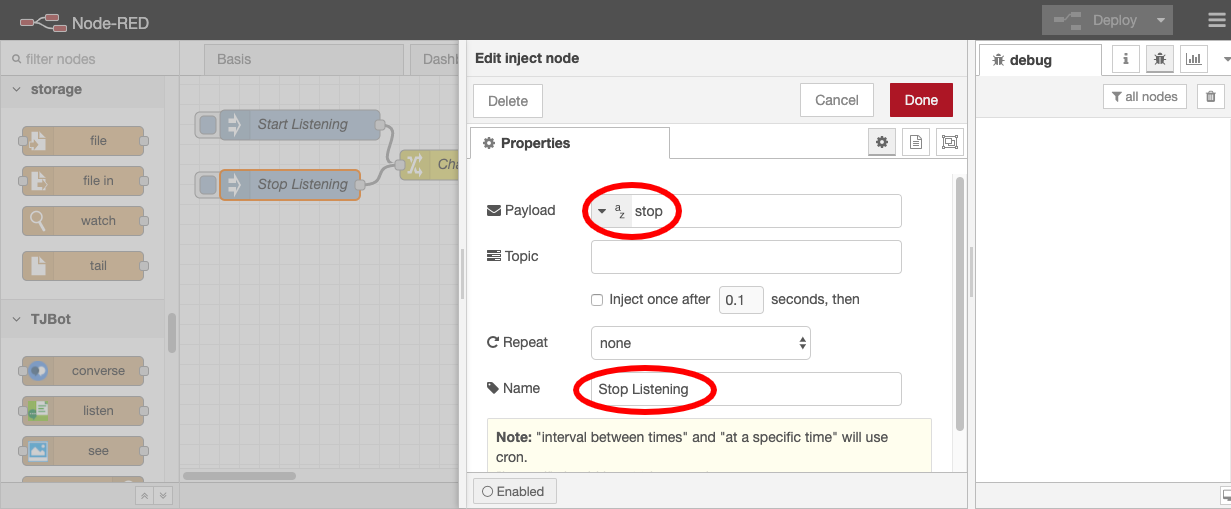
Now adjust the second "inject" node.
Payload: <String> "stop"
Name: "Stop Listening"
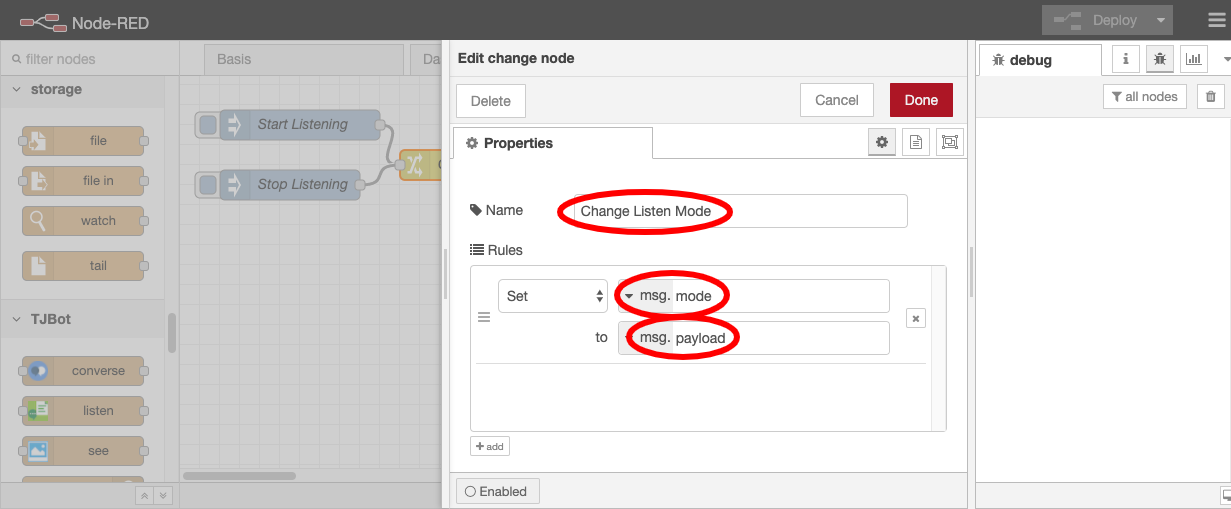
Now adjust the "change" node:
Name: "Change Listen Mode"
Set: "msg.mode"
To: "msg.payload"
You now only need to open the listen node so that the default configuration is chosen and click on "Done".
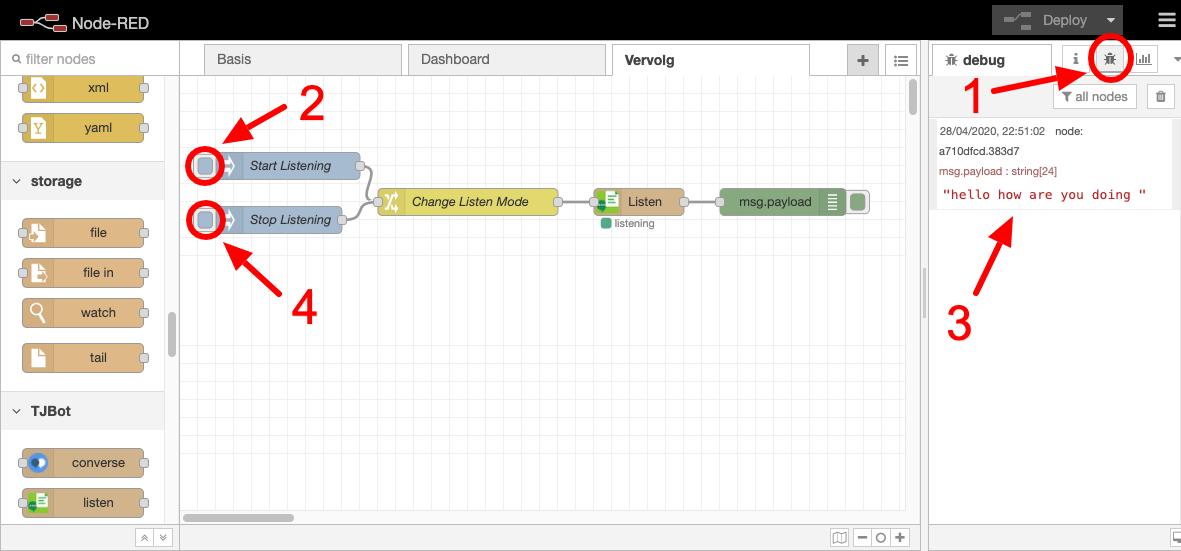
Now click on "Deploy" and test your "listen" flow. First click on the bug icon (arrow 1). You will see all the "debug" messages appear in the right side of the screen. Now click on the "Start Listening" Node (arrow 2) to let the "listen" node listen. Now say something into the microphone of your AI-Bot. As soon as your AI-Bot has heard you correctly, you will see a debug message appear on the right side of the screen (arrow 3). When this is successful you can stop the "listen" node by clicking on the "Stop Listening" Node (arrow 4).
Having a conversation
We are now going to build a simple conversation with your AI-Bot.
[Ask here for an explanation about IBM Watson Assistant, you need this to be able to execute the assignment at the end of this section]
To do this, drag an "inject" Node, a "converse" node and a "debug" node to the "Advanced" worksheet.
Place all these nodes under the previous "listen" flow you built above.

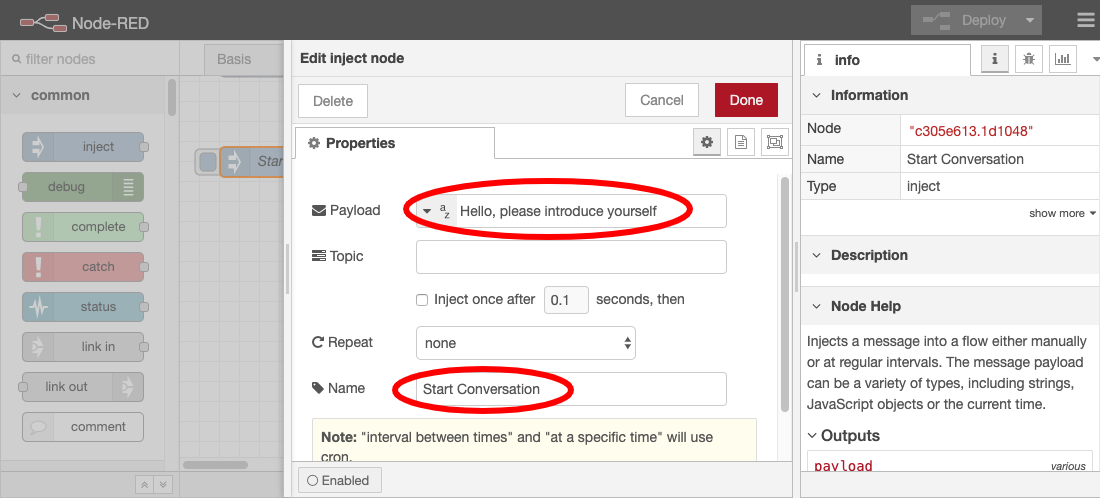
Now adjust the "inject" node:
Payload: <string> "Hello, please introduce yourself"
Name: "Start Conversation"
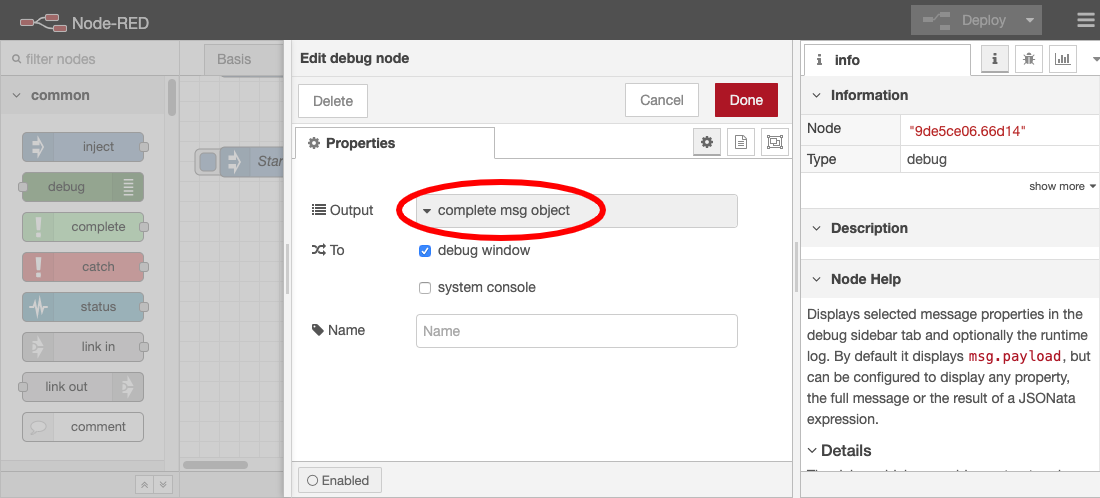
Edit the "debug" node. Under "Output", select "complete msg object" instead of just "msg.payload".
Now you can see in the debug window on the right what is in a message and not just the payload part.
Double click the converse node to choose the default configuration and click "Done"
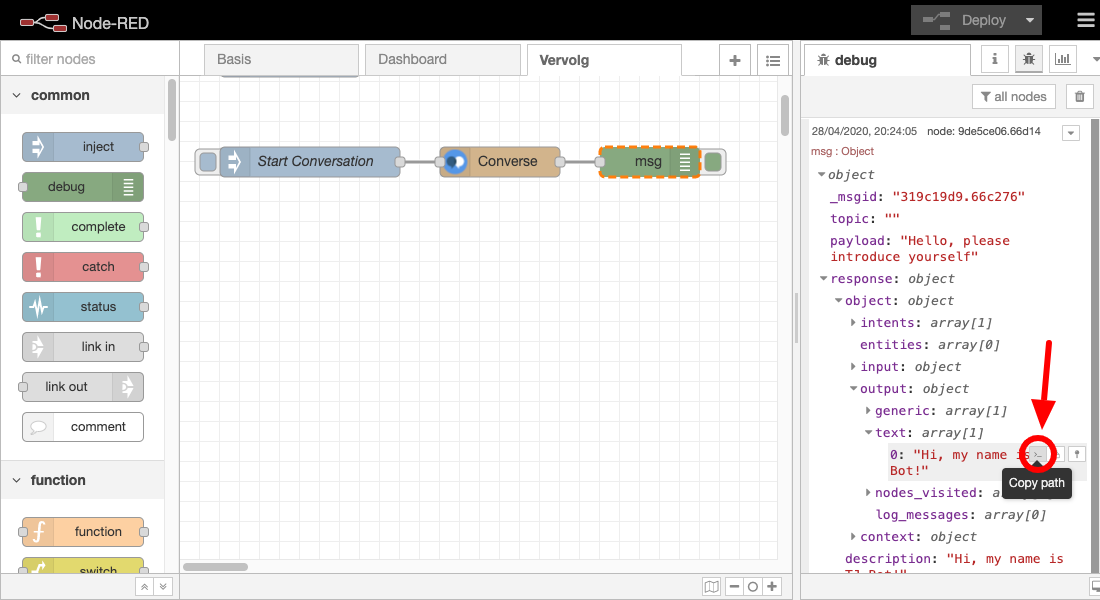
Now click on "Deploy" and test your "conversation" flow. Don't forget to click on the "bug" icon (arrow 1) before you start the flow (arrow 2).
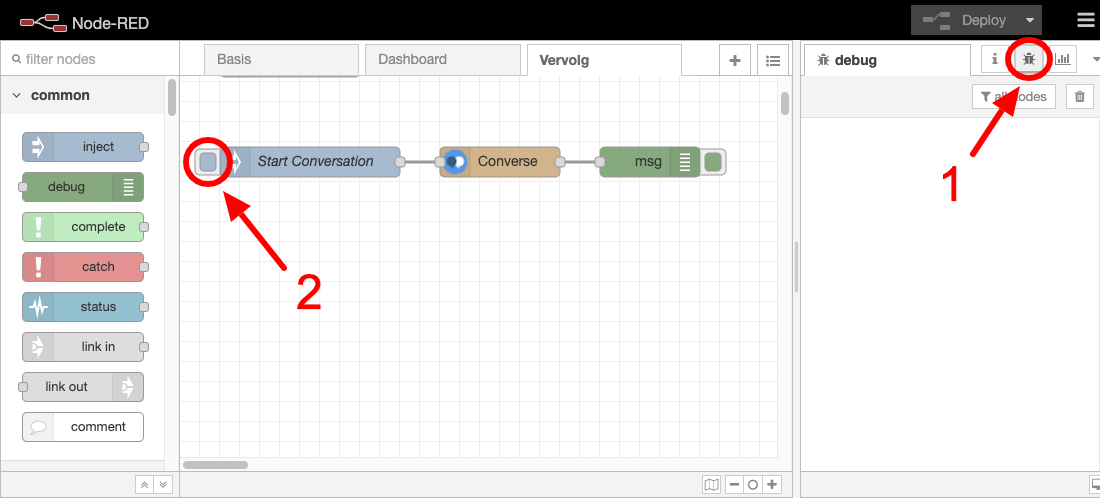
You will now see the response of your AI-Bot in the debug window on the right.
Open the message so that you see at msg.response.object.output.text[0] what kind of answer your AI-Bot has given.
Now move your mouse over the answer and click on the first icon on the left that appears ("Copy Path").
You copy the variable in which the answer is returned.
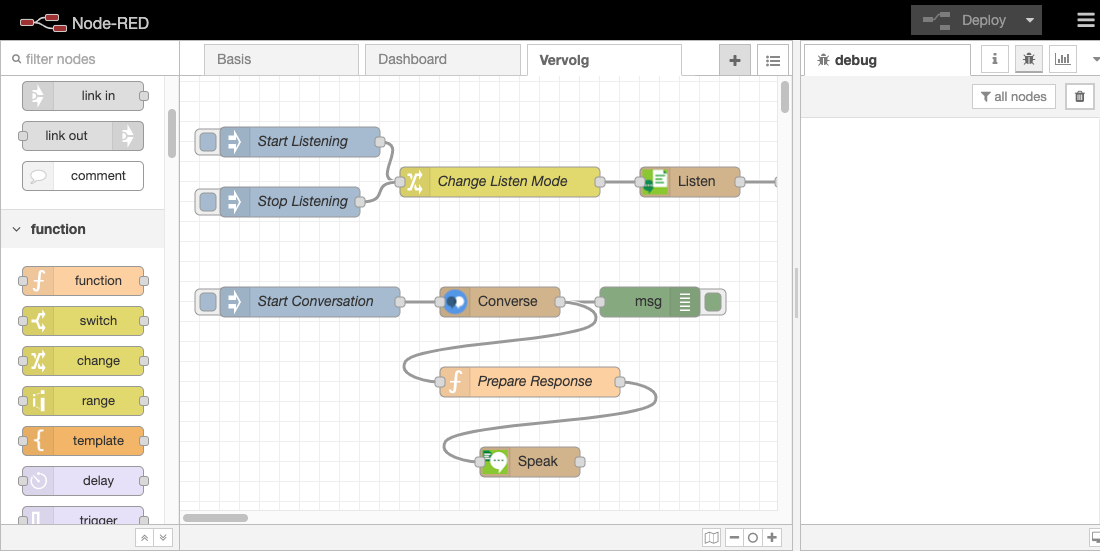
We now want your AI-Bot to say the answer. For this you need a "function" and a "speak" node.
Drag these two to the "Advanced" worksheet as in the example below.
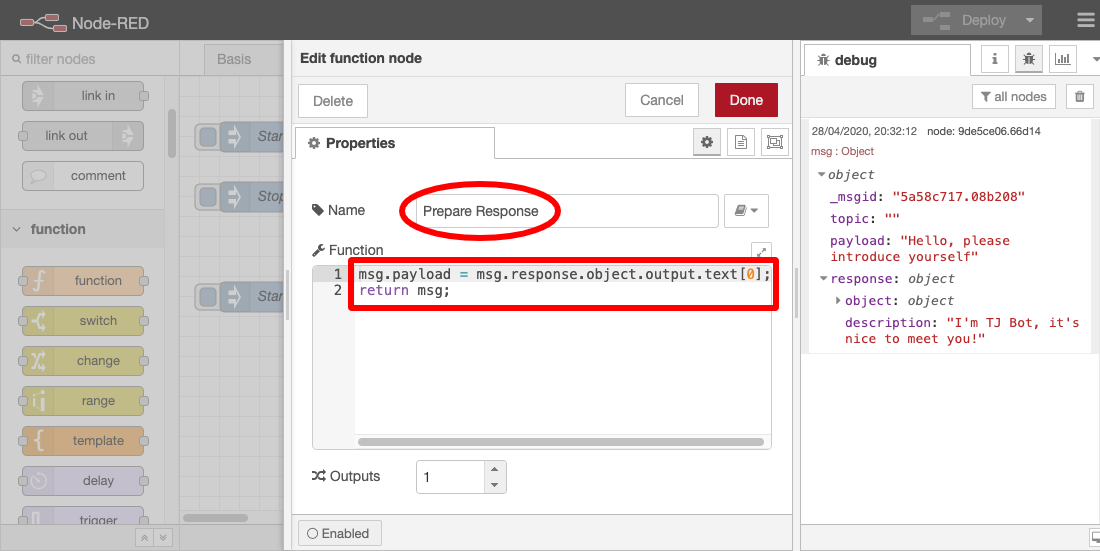
Now adjust the "function" node as follows:
Name: "Prepare Response"
Function: Paste here the "variable" that you copied via the "Copy Path" icon at the top of the text field.
And now finish the code so that the first line states:
"msg.payload = msg.response.object.output.text [0];".
With this "function" node you now ensure that the answer of your AI-Bot is placed in an msg.payload. And the msg.payload will be forwarded to the "speak" node. Now click on "Done".
Also open the "speak" node and select the "Speak" option at "Mode" and click "Done".
Click on "Deploy" and see if your AI-Bot is now saying the answer.
Assignment
In the above flow you ask the AI-Bot to introduce yourself. The default name is "TJ Bot".
Can you now change the response so that your AI-Bot will use his or her own name in all answers?
Tip: Login to IBM Cloud and go to Watson Assistant -> My First Assistant -> TJ Bot Skill.
Recognize Intent
In the response of the AI Bot, an "intention" is often sent back if it is recognized by your AI Bot.
Your AI-Bot tries to understand what you are asking, to figure out the purpose of your question.
We are going to try to get the intention out of the answer from your AI-Bot.
But first we will let your AI-Bot respond to questions that you can ask with your voice.
You do this by connecting the output of the "listen" node to the input of the "converse" node as in the example below.
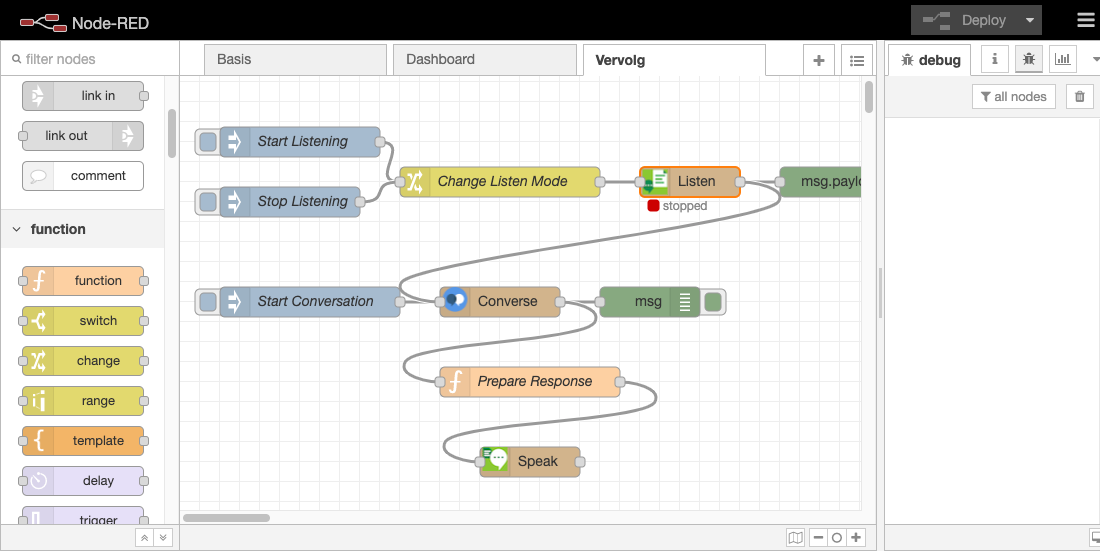
Now click on "Deploy" and then on the "bug" icon to display the debug screen.
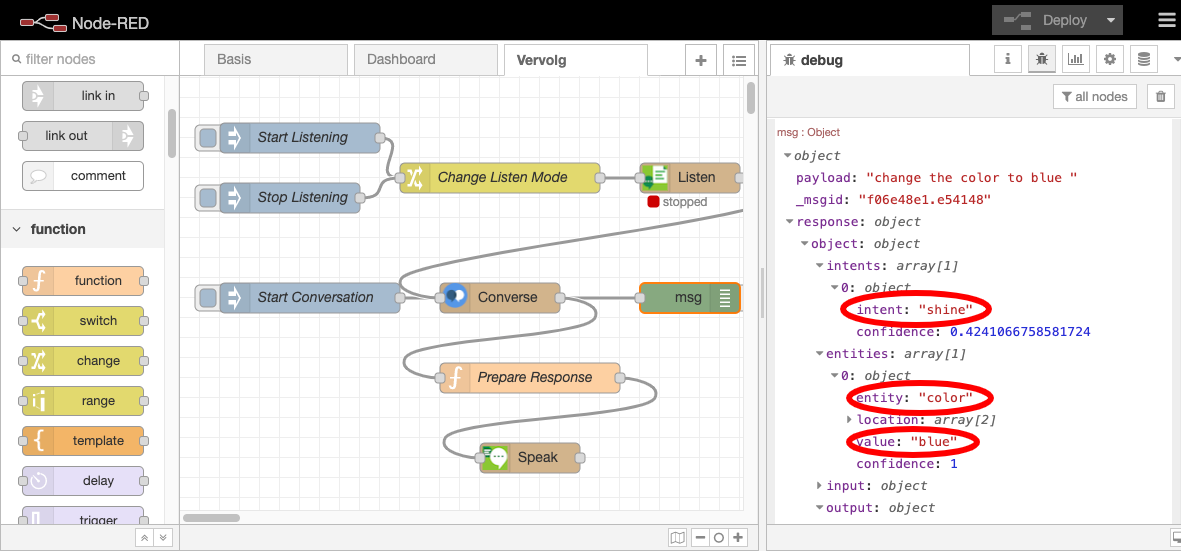
Now click on the node "Start Listening" and say the following in the microphone: "Change the color to blue".
You should now find the "intent" in the reply message, namely "shine".
And with "shine", you must of course also know in which color you should light the lamp.
These values are reflected in the message at msg.response.object.entities [0] .entity ("color") and msg.reponse.object.entities [0] .value ("blue").
Now let's try to get your AI-Bot to do things using the intents.
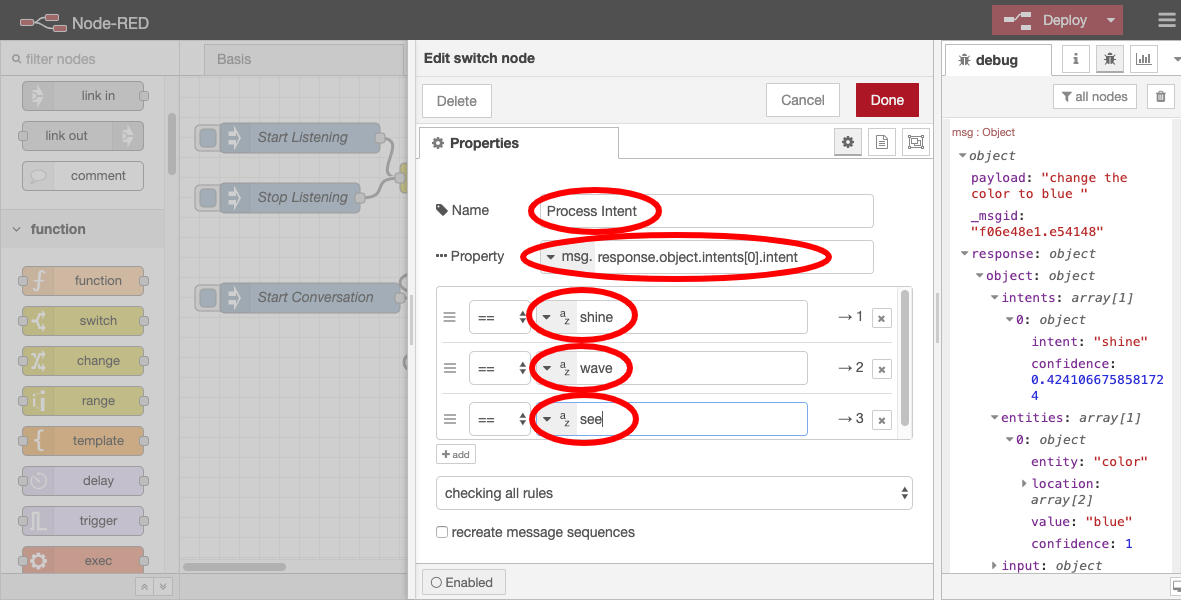
To do this, drag a "switch" Node to the "Advanced" worksheet and connect the output of the "converse" node to the input of the "switch" node. Now double click on the "switch" node and adjust it as follows:
Name: "Process Intent" (Means "Process Intent")
Property: "msg.response.object.intents [0].intent"
Now create three <string> options: "shine", "wave" and "see"
You are now reading with this "switch" node the intent that was returned in the answer.
Now click on "Done".
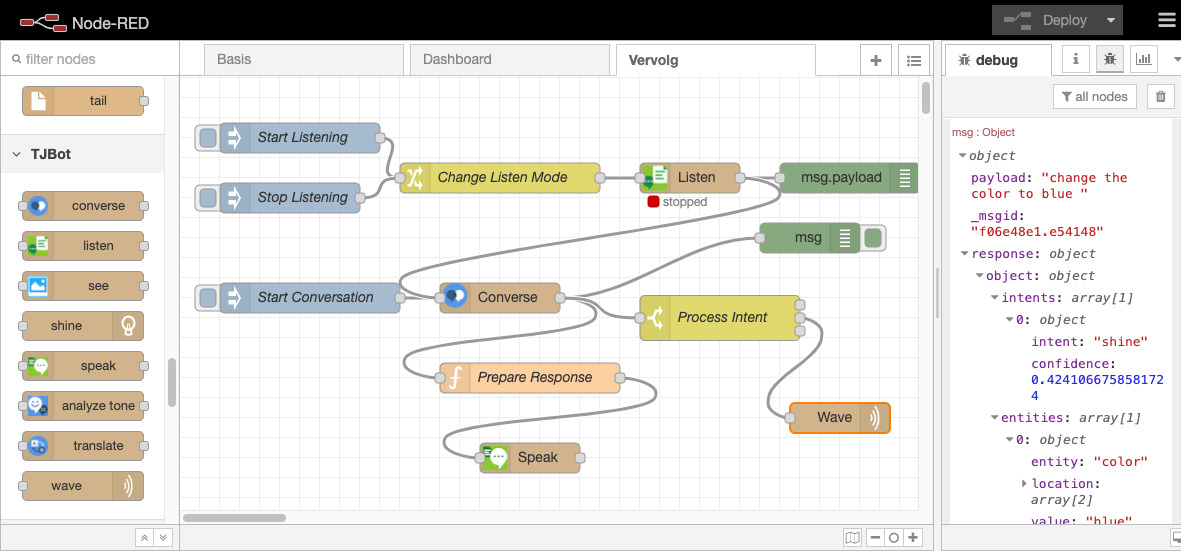
For each option you have created in the "switch" node you will see an output. The "switch" node now has 3 outputs, for "shine", "wave" and "see". The order of the outputs is the same as what you could see in the "switch" node (see image above).
Since the second output stands for "wave", drag a "wave" node to the "Advanced" worksheet and connect the input of this "wave" node to the second output of the "switch" node. Double-click the "wave" node once to use the default configuration, then click "Done". Now click on "Deploy" and then on "Start Listening". Now ask your AI-Bot in the microphone: "Please wave your arm" and see if this intent is recognized.
Recognizing Objects
Finally, in this advanced lesson we will let your AI-Bot recognize objects.
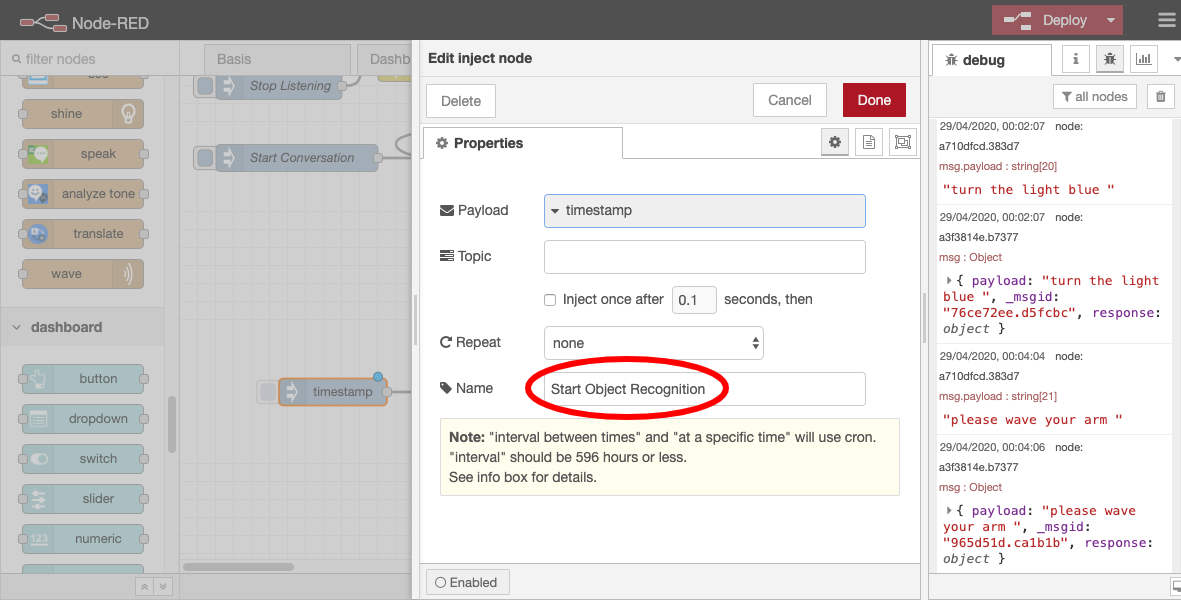
To do this, drag an "inject" node, a "see" node and a "debug" node to the "Advanced" worksheet.
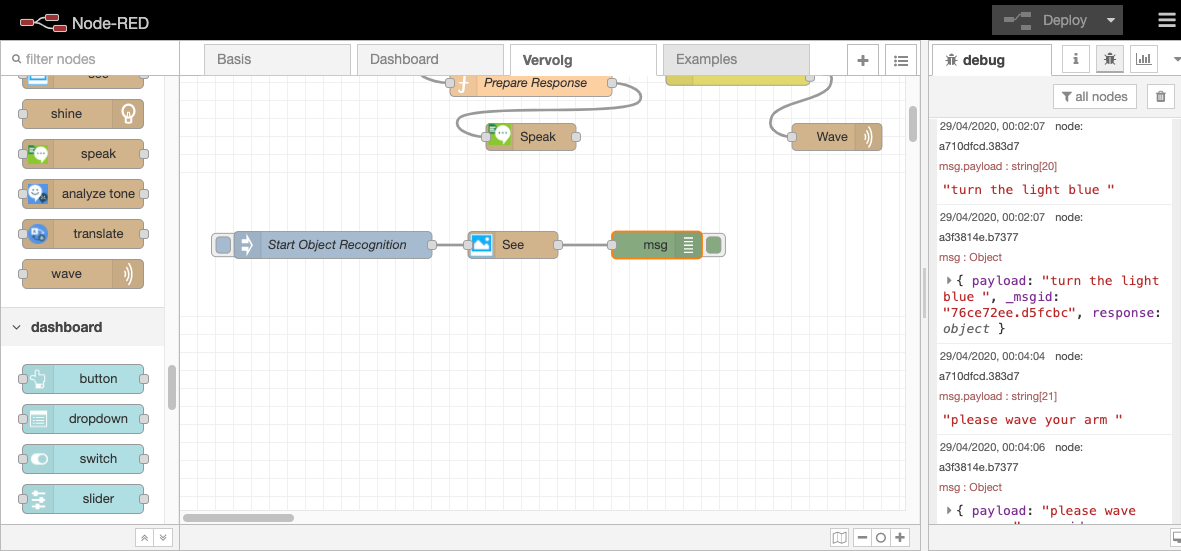
Adjust the "inject" node:
Name: "Start Object Recognition"
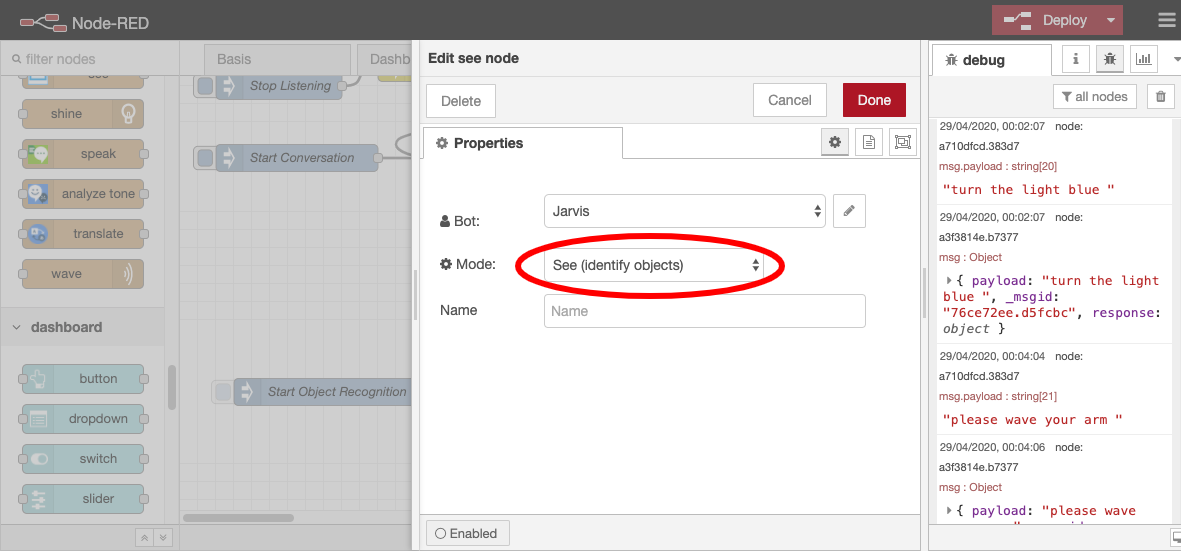
Edit the "see" node:
Select the option "See [identify object] at "Mode".
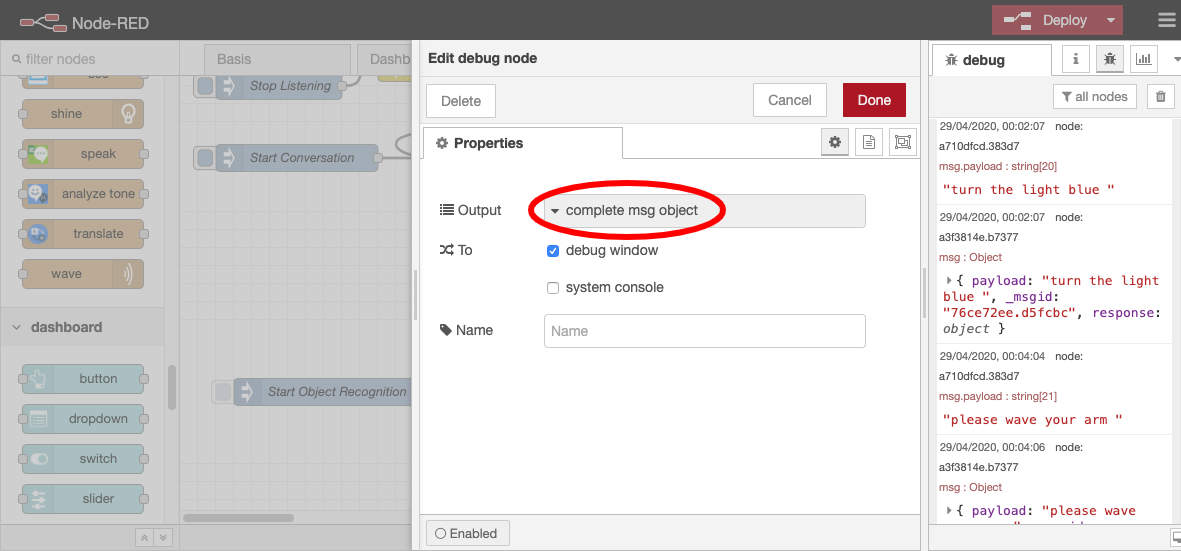
Edit the "debug" node:
Select "complete msg object" at "Output.
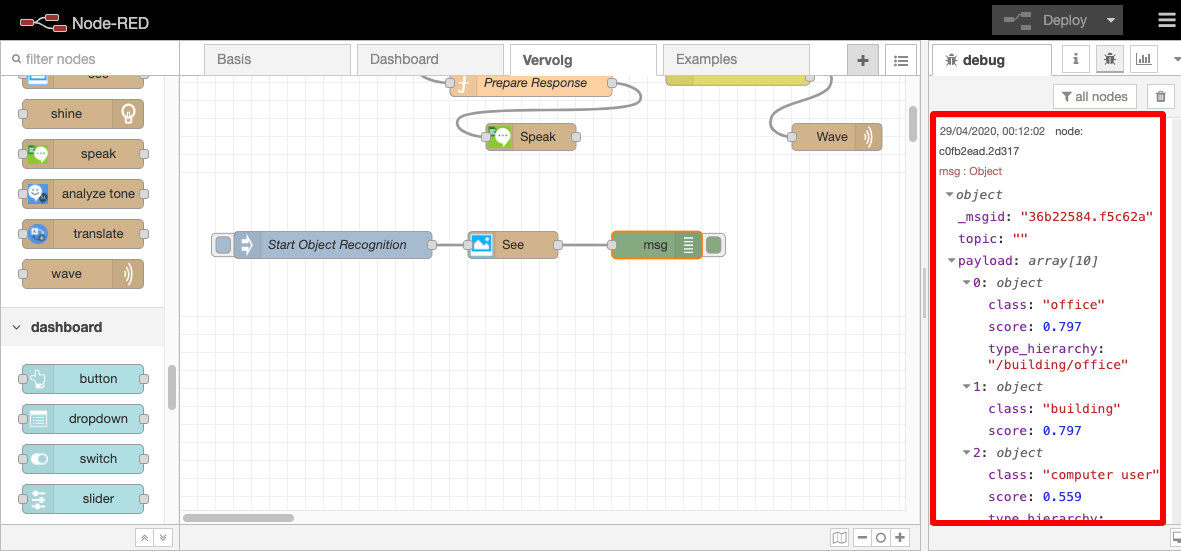
Now click on "Deploy" and press the "Start Object Recognition" node.
Check the debug screen to see how many objects are recognized and whether this is correct.
Assignment
Complete the "Advanced" worksheet so that your AI-Bot will say the first 3 objects it sees when you ask the question: "What do you see?"
Tip: Connect the first output of the "switch" node to the input of the "see" node.
Process the answer in a "function" node using this piece of code:
var objects = msg.payload;
var speech_text = "I'm not sure I see anything.";
if (objects.length == 1) {
var item = objects[0].class;
speech_text = "I see " + item;
} else if (objects.length == 2) {
var items_2 = objects[0].class + " and " + objects[1].class;
speech_text = "I'm looking at " + items_2;
} else if (objects.length > 2 ) {
var items_more = objects[0].class + ", " + objects[1].class + ", and " + objects[2].class + ", and a few other things too";
speech_text = "I'm looking at " + items_more;
}
var newMsg = { payload: speech_text };
return newMsg;
Send the result of the "function" code to a "speak" node.