 Nederlands
 English
Node-RED - Basics
We are now going to start programming your AI-Bot. Open Node-RED in a browser on your laptop:
http://raspberrypi:1880
You now see the visual programming environment for Node-RED.
On the left you see in a long list all different Nodes that you can use, grouped in different categories. In the middle you see a worksheet named "Flow 1". And on the right side is shown information about Nodes you will be working with.
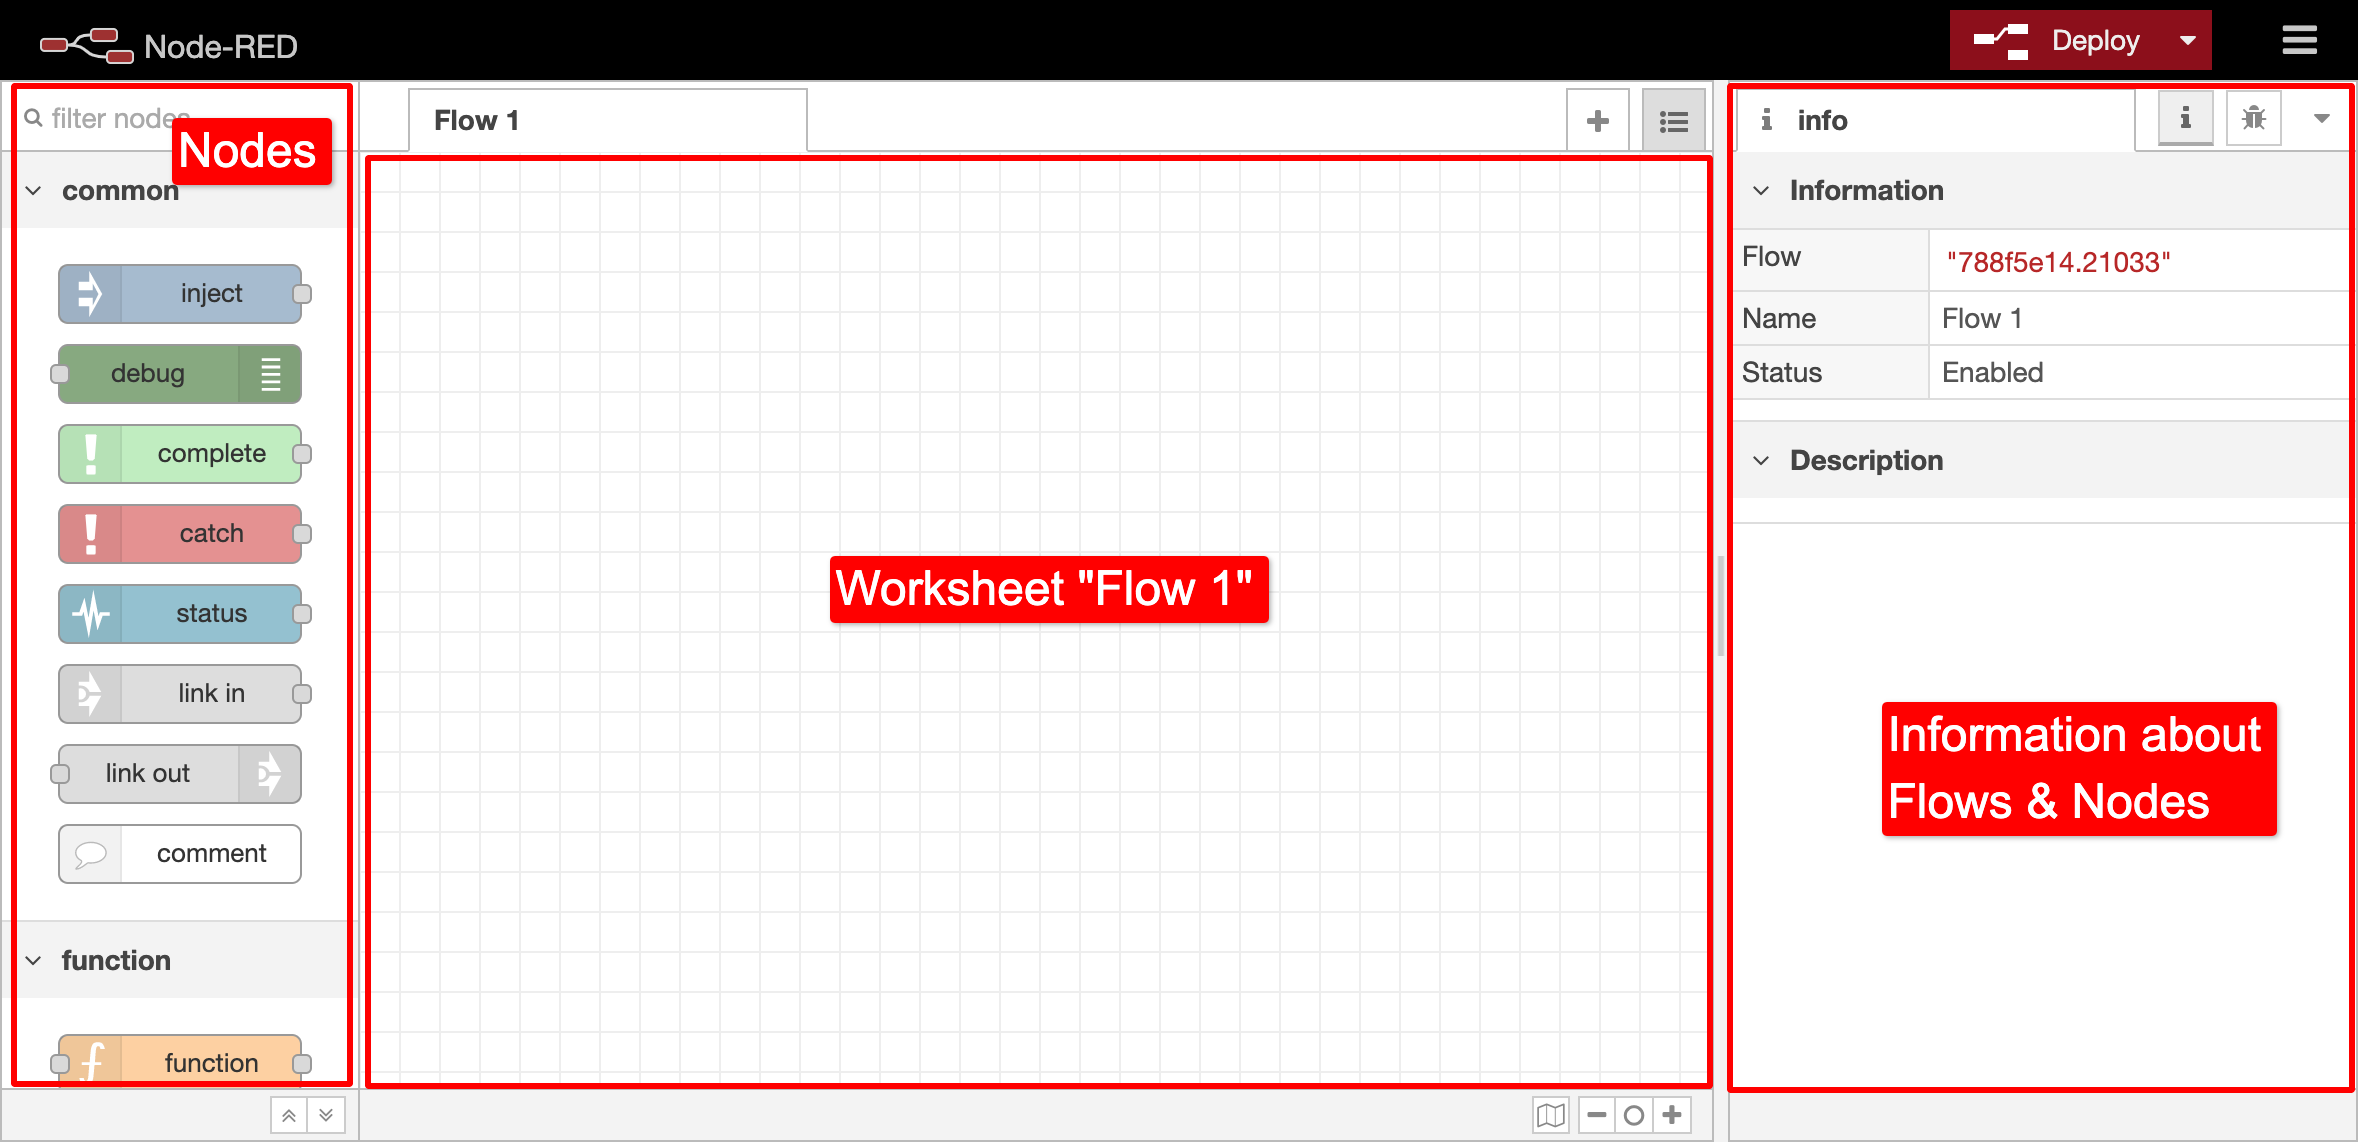
But what exactly are Nodes? Nodes are all small building blocks that you can use to program your AI-Bot. You can all tie those building blocks together on a worksheet, so you have a so-called 'flow' of building blocks that are connected to each other. A 'Flow' consisting of 'Nodes'.
Because there are many different types of building blocks (Nodes) available for Node-RED, it is impossible to try them all today. The intention is for you to understand how Nodes work and learn how to use Nodes yourself.
The First Steps
Now drag a node “Wave” under the heading “TJBot” from the left list to worksheet “Flow 1”.


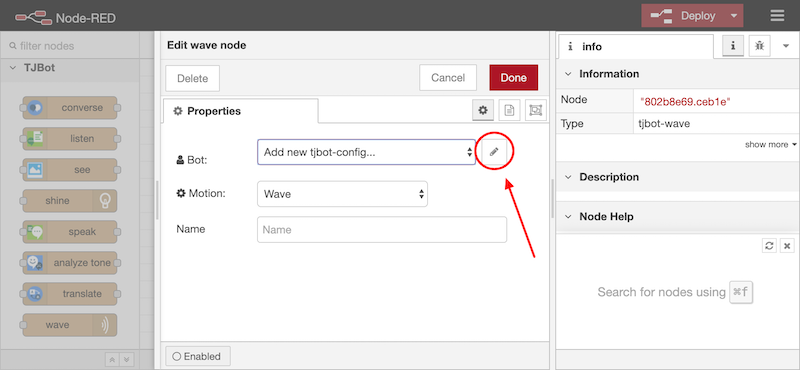
Double click on the node “Wave” that you just dragged to worksheet "Flow 1". Now click on the pencil icon (where the red arrow below points to).

Then select the options:
Gender: Male or Female, this is for speech. Do you want your AI Bot to speak with a male or female voice?
Speak: Choose English, British or American Dialect here.
Listen: Choose UK or US English here.
Has: Select all options here: Servo, LED, Camera, Microphone, Speaker
Name: Name of your AI-Bot
And enter the API keys and URLs that you collected during the preparation for the following 4 AI services.
With Watson Assistant you must also enter the previously saved Skill ID in the textfield behind Workspace ID. You can remove the URLs that have already been entered and replace them with your own URLs:
- Watson Assistant: API Key, URL & Workspace ID
- Speech to Text: API Key & URL
- Text to Speech: API Key & URL
- Visual Recognition: API Key & URL
Now click on the “Add” button and then on “Done”.
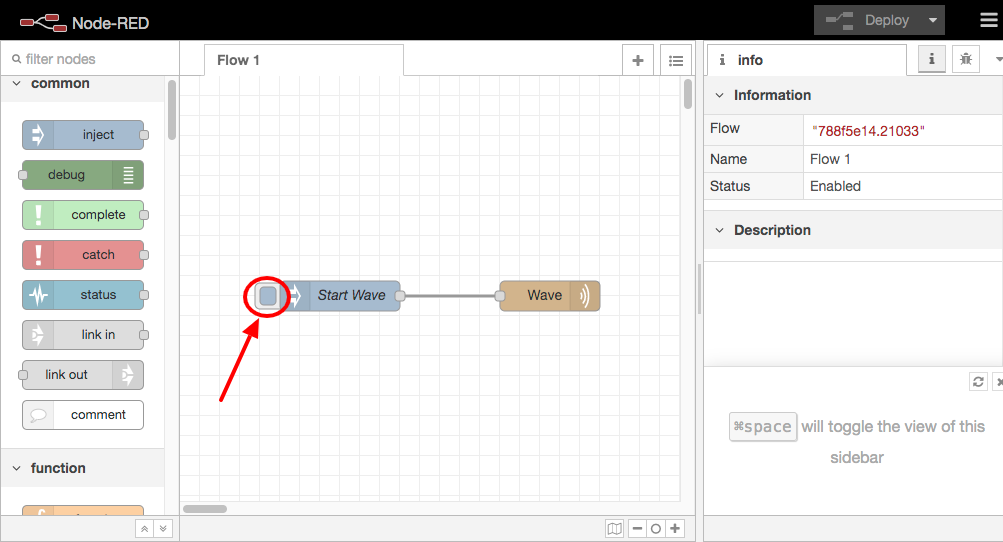
Now drag an “inject” node under the heading “common” from the left list to the worksheet “Flow 1”. With the "inject" node you can inject something into a Flow, as it were. Now connect the inject node to the wave node. You have now created a simple Flow with two Nodes.
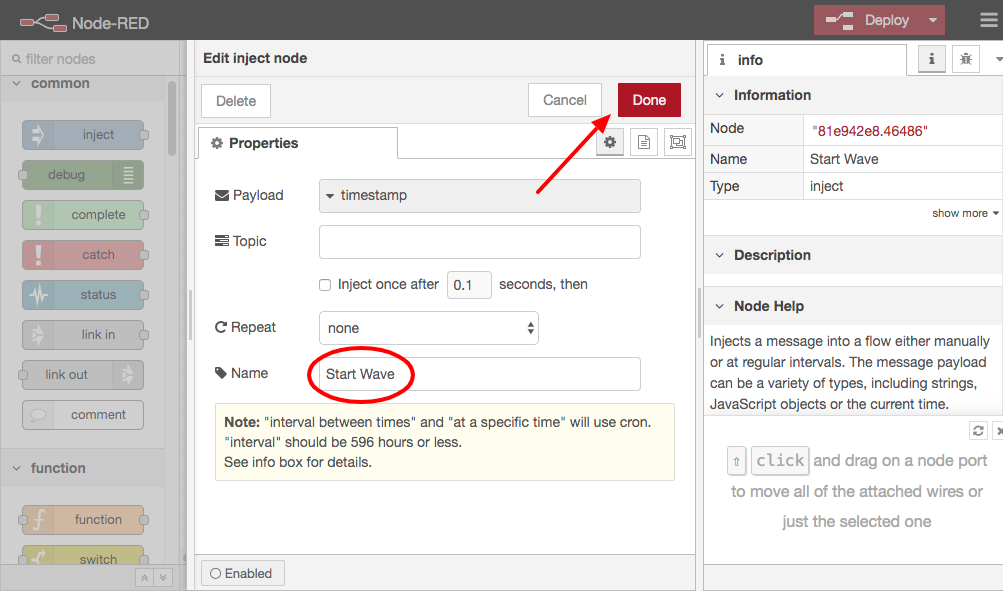
Now double click on the inject node and give the Node a name: "Start Wave". Then click on the 'Done' button.
Now click on the “Deploy” button at the top right of the web page. By pressing the button "Deploy" you ensure that the flow, the computer program you just put together, can be used.
Now click on the button on the left of the "inject" node "Start Wave". This triggers the exucution of the Flow.

If all goes well, the arm of your AI-Bot will start to wave. When your AI-Bot has finished waving, you can screw the arm with a screw that came with the servo using a small Phillips screwdriver.
A Step Further
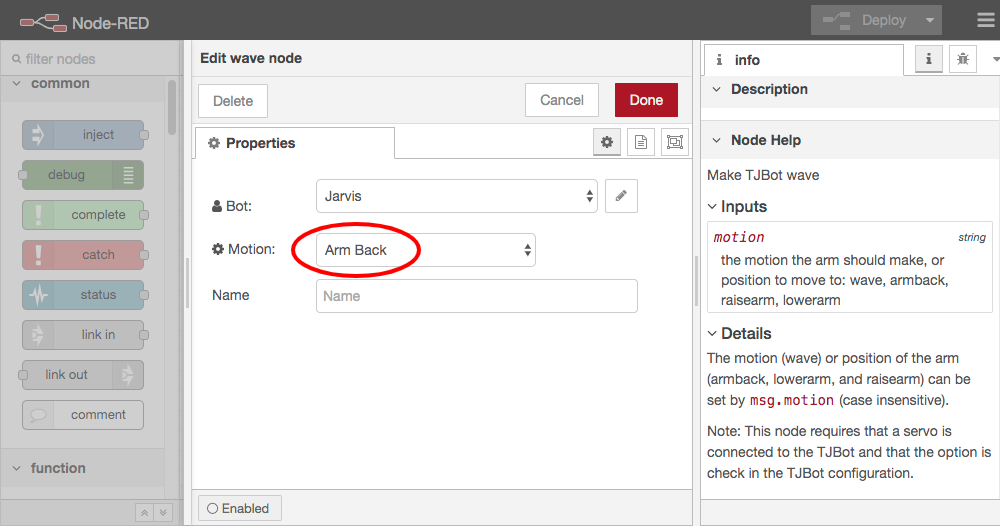
Now double click on the Node 'Wave' that you have placed on 'Flow 1'. You see at Motion that you have different options to move the arm of your AI-Bot. Now select the "Arm Back" option and click the "Done" button. Don't forget to click the "Deploy" button and test the new movement now.
Now double click on the Node 'Wave' again. At Motion you can also choose the following option: '- set msg.motion -'.
This means that this node can perform the movement that is sent in a message. "msg" is short for the English word message. So you have to send the command for the movement (motion) to the Node in a message. You can see to the right of the information about the Node which options can be used: wave, arm back, raise arm and lower arm. But how do you actually send such a message?
First make sure that the Motion is set to '- set msg.motion -' and then click 'Done'.

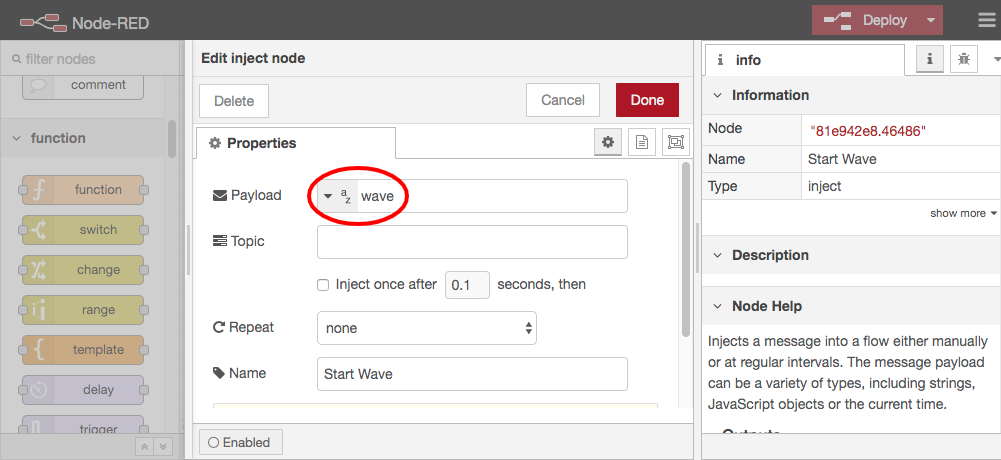
Now double click on the inject Node "Start Wave" and change the Payload of the Node from a "timestamp" (the time in seconds, counted from 01-01-1970), to a "string" and then enter the value "wave". If you click on the button of this inject Node later, it will send a message with "wave". This value is then sent in a variable "msg.payload". The meaning of Payload within Node-RED is "data that is sent for a specific purpose". Now click on "Done".
We will send the command "wave" using a variable "msg.payload", but the Wave node only accepts a variable "msg.motion". How can we resolve this mismatch? We can solve this using a "Change" Node.
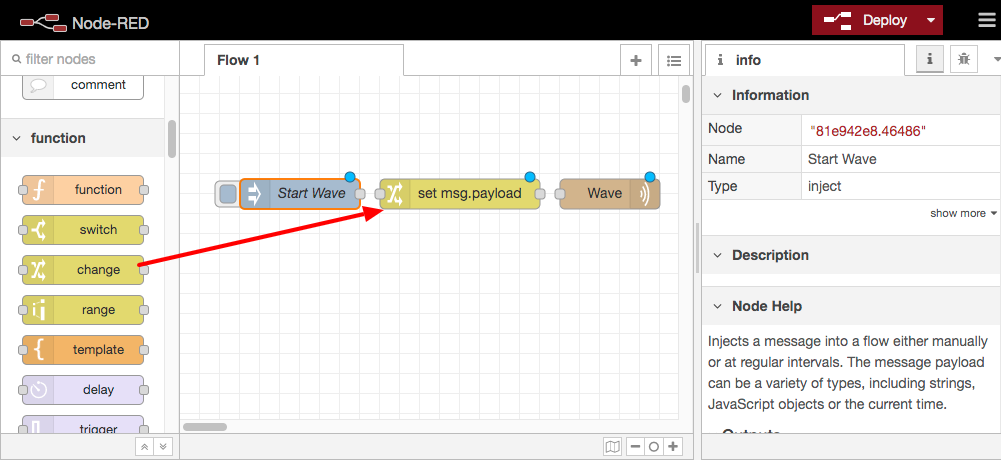
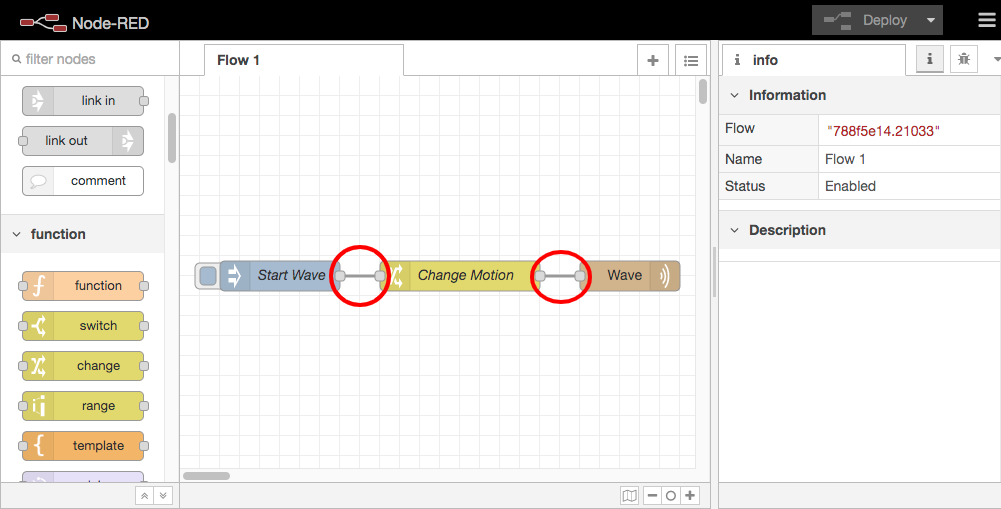
First click on the line between the inject node "Start Wave" and the wave node "Wave". Then click "Delete" or "Backspace" on your keyboard to remove the line. Now drag a "change" node under the heading "function" between the node "Start Wave" and "Wave".

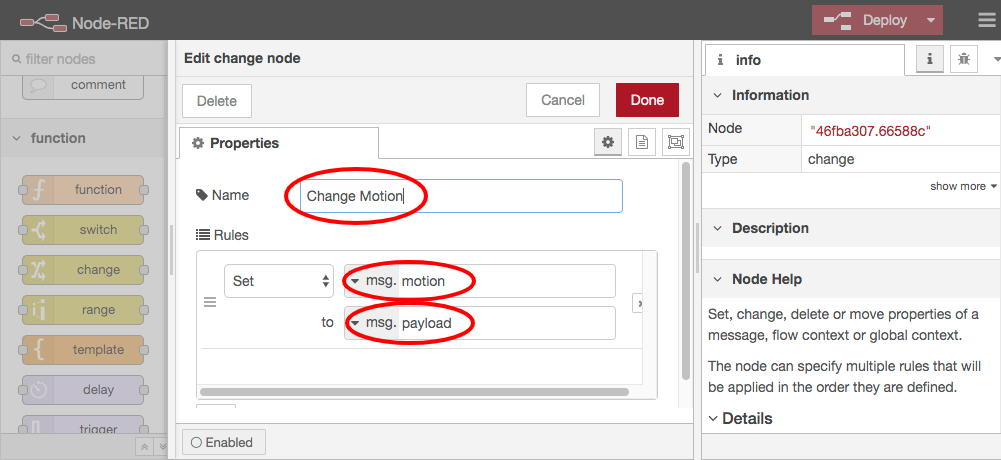
Now double click on the new 'Change' Node and name it "Change Motion". And as the example below, after "Set" enter the value "msg.motion", and after "to" the value "msg.payload". This will ensure that everything that comes in to msg.payload in the variable msg.motion is forwarded. Now click on "Done".
Now connect the three Nodes together, press "Deploy" and test your new Flow.
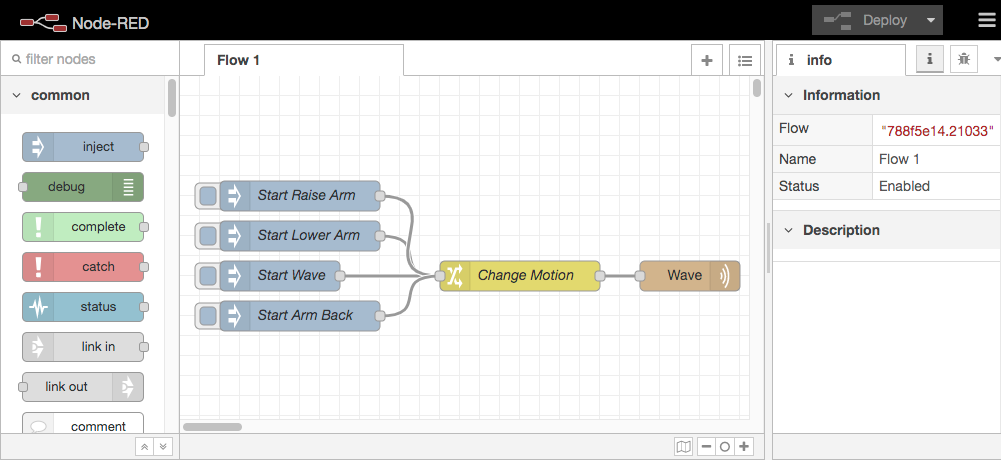
If this works well, make sure that all 4 arm movements can be performed as in the example below.
Assignments
Now try to mak the three following three assignments yourself:
- Make sure that the LED light of your AI-Bot lights up blue.
Tip: Use the Node "Shine" under the heading "TJBot" - Now make sure that the LED light can light up in 4 different colors using 4 inject nodes.
Tip: Select Color '- set msg.color -' and read the info at the Shine Node. (Also check here for more information about HTML colors: https://www.rapidtables.com/web/color/html-color-codes.html) - Build a flow that makes your AI-Bot say something.
Tip: Use the Node "Speak" under the heading "TJBot". Read the documentation of the Node "Speak" so you understand what type of variable you need to send with the Inject Node.